If you are new to this blog . . .

If you are new to this blog you may want to check out the post on putting together a food storage meal plan so you can better understand how this blog is organized.

Wednesday, January 11, 2012

Homemade Hamburger Buns


Making Hamburger Buns is quick and easy once you have figured out making bread dough. You'll find one of our favorite recipes here. Really, any basic bread dough will work, you can even use frozen dough if that is how you do things in your kitchen.


When I make bread, I always fill my big mixer so it gives me enough for 3 loaves. This picture shows me dividing the dough into 3 equal portions.

Flatten one portion out to be the height of a wide mouth canning ring.

Use the canning ring as a cookie cutter to cut out the hamburger buns.

Place buns on a greased baking sheet. I always shape the remaining dough into a bun the best I can. You'll notice the "odd" looking one squished in the middle there. Allow enough room between buns for them to rise without touching.

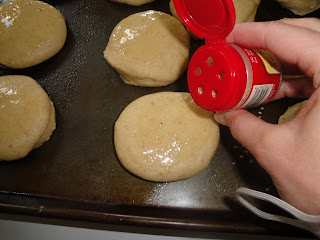
Spray the tops of the buns with Pam and sprinkle with sesame seeds if you want to. I don't usually bother with this step, but I wanted you to see the true result. Let the buns rise until about double in size.

Bake at 350° F for 12-15 minutes or until lightly browned. You can see the "odd" bun quite well here. Oh well, my husband isn't picky. He'll love the little bit bigger bun. Cool on a wire rack. Slice and use for hamburgers, sloppy joes, pulled pork, chicken salad, etc. These freeze very well so don't hesitate to make a large batch one day and be set for quite a few meals. If you  freeze sloppy joe filling or pulled pork, you'll have an entire meal ready to go in 10 minutes or less for a busy night.

Storable Dessert - Chocolate Cream Pie

Pie crusts freeze so well.  I always keep some on hand for a quick dessert or a pot pie for dinner.

When baking an empty crust, place a piece of foil on the crust and fill it with a handful of dry beans.  I used black beans.  They hold the crust down so it isn't full of air bubbles when you take it out of the oven.  Bake at 400 degrees for 8-10 minutes or until lightly browned. Cool.

Mix a small box of chocolate pudding or any other flavor you would like with 1 1/2 cups of reconstituted powdered milk.  Chill until set.  Fold in 8 oz of frozen whipped topping, thawed. Fill pie crust with pudding mixture. We like to add bananas to our chocolate pie and coconut to vanilla pudding for a coconut cream flavor. Top with additional whipped topping before serving.


The last time I made pie crusts, I did 5X the batch so I ended up with 10 pie crusts. We used some at Thanksgiving and then I have had them ready to go since then.

Pie Crust
This crust recipe freezes very well. Double or triple the batch and freeze in individual crust sizes. It will keep for 6 months or more in the freezer.

2 cups all-purpose flour
1 cup shortening
½ tsp salt
Ice water


Cut the shortening into the flour and salt mixture with a fork until the pieces of shortening are between the size of quarters and nickels (no smaller.) Add ice water a tablespoon at a time. Toss the moistened area with a fork until it begins to pull together into a ball. Set it aside and add more ice water to the dry parts, tossing as you go. When all the dough is moistened, but not sticky, separate it into two parts. Shape into disks about 4 inches across and wrap in plastic wrap. (You can freeze the dough at this point to use later. Thaw and roll out when it is still cold.) Refrigerate the dough for at least 10 minutes, but 2–3 hours is best. (The trick to a crispy crust is larger pieces of fat that are cold so they can create pockets of steam in the crust when it bakes.) Roll out between two pieces of plastic wrap to fit the pan. If baking empty, place a piece of foil over the crust and fill with a hand full of dry beans. This will keep bubbles from forming in the crust. Bake at 400° F for 8–10 minutes until lightly browned. If filling crust, use a precooked filling that is already thickened to speed up the baking process. Top with crust, cut a few vent holes, and bake at 400° F for 30–35 minutes or until golden brown. Check after 25 minutes and cover edges with foil if crust is browning too quickly.

Storable Lunch or Dinner - Meat Pasties

Meat pasties are basically single serving size meat pies. History tells us that miners used to take them in their lunches in place of a sandwich. It is one way to trade up the way you serve beef or chicken stew. I've done them with canned meats and dehydrated vegetables and they turn out deliciously! I also use items from my freezer sometimes. This time, I mixed frozen peas and carrots with hashbrown potatoes. I stirred in some precooked hamburger and then made a thick gravy using reconstituted powdered milk, flour, beef bouillon, onion, and garlic. I mixed all of this together for the filling.

Roll out pie crust (I always keep some in my freezer ready to go.) and place filling on top.

Fold over and crimp the edges well. Cut a few slits for ventilation. (These pasties can be frozen at this point for up to 3 months.)

Bake at 400 degrees for 20-30 minutes or until the crust is lightly browned.

Enjoy with your favorite side dish - we opened some bottled fruit to make it an easy night.