If you are new to this blog . . .

If you are new to this blog you may want to check out the post on putting together a food storage meal plan so you can better understand how this blog is organized.

Tuesday, July 26, 2011

Storable Snack - Cinnamon Swirl Bread


This post is for all those out there who missed my bread making class. The ladies who came learned the simple secret to delicious homemade cinnamon swirl bread as well as some tips and tricks for making bread of any kind.

For cinnamon swirl bread, you can use any basic bread dough recipe. You'll find one of our favorites here. Once the dough is finished with its first rise, roll it out into a rectangle that is about as wide as your loaf pan.


Spray the dough with Pam or spread with melted butter.

Sprinkle brown sugar on the dough.

Be sure to get it out almost to the edge.

Sprinkle with Cinnamon and Sugar mixture. (Just mix a little cinnamon with some sugar. I always keep some mixed in one of my old cinnamon bottles so it is ready at all times to make cinnamon toast or sprinkle on a pie or whatever.)

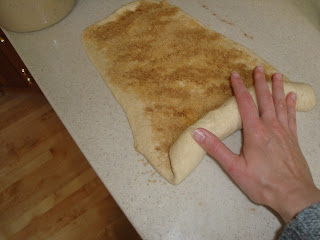
Roll up tightly, beginning on the short side.

Pinch the seam to seal tightly.

Tuck the end under so it will fit your pan and give a nice rounded look to your loaf.

Here it is with both ends tucked under.

Place in a greased loaf pan. Spray the top of the loaf with oil to keep it soft as it rises.

Cover with a towel until it has reached the top of the pans. Bake at 350 for 25-30 minutes.


Enjoy a little slice of heaven!

Monday, July 25, 2011

Your wheat will be more valuable than money

The time will come that gold will hold no comparison in value to a bushel of wheat.
~~~~ President Brigham Young

Anyone who has ever been in a situation to rely on their food storage or 72-hour kit will agree with this statement from long ago. All the money in the world can't provide for your family in an event that all the supply lines are cut off.

As James and I have considered the amount of money we need to have saved for our 6 month Emergency Fund, we keep in mind that we have our food storage so we do not need to save enough to cover the cost of groceries every month. This significantly reduced the overall amount we needed to save and helped us reach our goal must faster.

I am also confident that our family likes what we would be eating and I know how to cook it. An organized food storage meal plan really brings a lot of peace.

Saturday, July 23, 2011

A few spots remain in the dehydrating class

Thursday, August  4th 1:00 pm Dehydrating Fruit
Cost $1.00 per family
Dehydrating fruit is a simple way to preserve food for later use. We will cover the basics of making your own healthy fruit rolls/snacks for your family and what to look for when purchasing a dehydrator. There will be tasting samples.

All classes will be taught by Tammy Price in her home. Children are always welcome to come and play while you learn. Your older children are welcome to come learn with us. Space is limited to the first 12-15 people so send me an email at tamara.e.price@gmail.com  if you are interested and I will reserve you a spot.

Friday, July 15, 2011

Storable Snack - Honey Graham Crackers

When it comes to food storage, I am a HUGE believer in needing to know what I can actually make with what I am storing.  With 5 kids, snacks are a BIG part of everyday.  Here is one of my favorite, healthy snacks.  I've been playing with this recipe for a little while and I think I have finally come up with a winner that has been taste tested and approved by over 100 people who have attended my most recent classes on food storage.  It makes a large batch, but the dough freezes very well so I can roll them out another day.  Enjoy!

Roll out dough between two pieces of plastic wrap.
Red plastic wrap was on clearance after Christmas so that is why this appears pink.
Cut out with cute shapes or just use a pizza cutter.
The flecks you see are from the ground flax seed.
Place on a greased baking sheet.

Cute and adorable - what kid wouldn't love these!  They taste very similar to Teddy Grahams but are just a little less sweet.


Honey Graham Crackers


1 cup butter or shortening
2 cups all-purpose flour
1 cup brown sugar, packed
2 tsp baking powder
½ cup honey
1 tsp baking soda
1 Tbsp vanilla
½ tsp salt
4 ½ cups wheat flour
3 Tbsp dry milk powder
1 cup ground flax seed, wheat germ,
or oat bran or additional wheat flour
1 cup water
2 tsp cinnamon, optional

Cream together the butter and brown sugar.  You can use a combination of butter and shortening or just one or the other.  Add the honey and vanilla.  Mix until combined.  Add the dry ingredients.  Use a combination of ground flax seed, wheat germ, or oat bran, if desired.  Begin mixing and add the water gradually until it pulls together into a stiffer cookie dough consistency.  Divide dough into 5-6 balls.  Wrap all but one in plastic wrap and flatten into a disk.  Refrigerate or freeze for later.  Roll the remaining ball out between two sheets of plastic wrap.  You want it to be very thin, much like pie crust.  Peel off the top layer of plastic wrap and cut the dough using mini cookie cutters or use a pizza cutter to cut into rectangles.  Prick the rectangles with a fork, if desired, for appearance.  Place crackers on a greased baking sheet and bake at 350° for 4-6 minutes until they are just turning brown along the edge.  Remove to a wire rack to cool.  You can roll them a little thicker and cut with a larger cookie cutter.  Bake for 7-8 minutes and use as a sugar cookie substitute.  The kids love to frost these and they have no idea they are eating a much more healthy treat.  You can store any leftovers in an airtight container or freeze for later.  For a dairy free version, you can substitute powdered soy or rice milk for the dry milk powder or you can omit it all together and use liquid soy or rice milk in place of the water.  You may have to adjust the amount of liquid slightly to make a stiff cookie dough.  For a honey free version, you can substitute brown sugar for the honey and adjust the water amount as needed.

Recipe Source: All Things Provident by Tamara Price

Wednesday, July 13, 2011

Storable Snack: Popsicles help beat the heat


Much of America is dealing with intense heat - everyone is looking for a great way to cool off. Homemade popsicles are a quick and easy way to have fun with your kids and cool off at the same time. It is quite easy to make them with ingredients that you have on hand.

There are many recipes online for making popsicles. A quick search for popsicle recipes will give you more than you will ever have a chance to make. We've made many different kinds over the years. One of our favorites is pudding pops. Just make up your favorite flavor of instant pudding using reconstituted powdered milk and freeze. We also freeze leftover yogurt smoothie which makes great popsicles. Use 100% fruit juice and add chopped fruit to make your own fun combinations. We love pineapple juice mixed with mashed bananas. We also stir in some homemade yogurt sometimes to make it creamy.You are only limited by your imagination and your room in the freezer.

Thursday, July 7, 2011

Emergency Preparedness: Ideas From Some Who survived this year’s disasters

This newsletter was prepared by Cynthia Hutchings of the Hobble Creek Ward - 

During the recent earthquake in Japan and tornados and now floods, in the Mid-West and South, I received these ideas from friends, family and LDS members who lived through these events. 

                My family ‘s hometown in southern Illinois was struck by 2 tornados and record breaking floods followed.  My daughter’s family in Texas were close to tornados and now wild fires.  Friends in Alabama were not directly hit with the tornados but their family and friends live in the Birmingham and Cullen areas.

1.       Sometimes there isn’t time to even grab a 72 hour kit, plan for this.  Have a family evacuation place, set up and know where you will meet if you get separated.  Have regular practice drills on how to get out in case of house and land fires, floods, earthquakes, explosions, tornados etc.

2.        Flashlights are good, but for long term events, a lantern is better .  A member in Japan said that she and others wished they had more candles on hand.  Most flashlights have to be held…while lanterns can be set on a surface and candles can be put in jars, cans etc.


3.       A generator saved frozen food storage in Alabama…while fuel generators were great,  but my friend is looking for a solar one that will not require large fuel storage.  They have been food storage experts for years, living in Alabama, but didn’t have a generator at first.  They had a full tank of gas so were able to drive 2 ½ hours north before they could even find a generator during this emergency.

4.       Practice cooking on your food storage stove, etc.   Using these things for the first time during an emergency can be trying.  Also be sure to know how to use all emergency equipment:  lanterns, generators, first aid, etc.

5.       When the tornados hit Alabama…it was difficult to get gas for your car, since the pumps run on electricity.  Our friends in Huntsville, Alabama were without electricity for five days…the few stations that had generators were overwhelmed with customers.

6.       Getting out of an emergency area may be critical:  Suggestion – keep your car filled at all times
A good rule is to fill it when it reaches ½ empty.

7.       From friends in Alabama: “I was sure grateful for my water storage…it saved us from a very difficult situation.  We couldn’t wash or bathe as often as we wanted to but at least we could eat.”

8.       Plan for sanitation  & water contamination.  Cooking with limited water and heat.  Medical situations. Have plenty of your prescriptions on hand.

9.        In Alabama phone service and communications went down.  Their cell tower was spared so they could use a cell phone, however, in other areas they didn’t even have this luxury.

REMEMBER THAT STORES AND RESTURANTS RUN ON ELECTRICITY- IN AN EMERGENCY THEY WILL BE CLOSED

Wednesday, July 6, 2011

There are a few spots remaining in the Bread Making Basics Class

Monday, July 11th 1:00 pm Bread Making  Basics
Cost $2.00 per family
Bring a loaf pan or a baking sheet. Everyone will leave with a loaf of bread to bake for dinner.


This is a great opportunity to review the steps if it's been awhile since you made bread. If you are new to bread making, you'll walk away thinking it is easy and wonder why you waited so long to give it a try. Join us for a fun-filled afternoon. You'll be taking your loaf home to bake it so your whole house will smell like fresh baked bread - yea!


Children are always welcome to come and play while you learn. Older children are welcome to come learn with us. Space is limited to the first 12-15 people so send me an email at tamara.e.price@gmail.com  if you are interested and I will reserve you a spot.

Friday, July 1, 2011

Storable Lunch or Dinner - Hamburger Buns


Making Hamburger Buns is quick and easy once you have figured out making bread dough. You'll find one of our favorite recipes here. Really, any basic bread dough will work, you can even use frozen dough if that is how you do things in your kitchen.


When I make bread, I always fill my big mixer so it gives me enough for 3 loaves. This picture shows me dividing the dough into 3 equal portions.

Flatten one portion out to be the height of a wide mouth canning ring.

Use the canning ring as a cookie cutter to cut out the hamburger buns.

Place buns on a greased baking sheet. I always shape the remaining dough into a bun the best I can. You'll notice the "odd" looking one squished in the middle there. Allow enough room between buns for them to rise without touching.

Spray the tops of the buns with Pam and sprinkle with sesame seeds if you want to. I don't usually bother with this step, but I wanted you to see the true result. Let the buns rise until about double in size.

Bake at 350° F for 12-15 minutes or until lightly browned. You can see the "odd" bun quite well here. Oh well, my husband isn't picky. He'll love the little bit bigger bun. Cool on a wire rack. Slice and use for hamburgers, sloppy joes, pulled pork, chicken salad, etc. These freeze very well so don't hesitate to make a large batch one day and be set for quite a few meals. If you  freeze sloppy joe filling or pulled pork, you'll have an entire meal ready to go in 10 minutes or less for a busy night.